43 KiB
Executable File
This documentation covers a mix of topics that include aspects ranging from how to use specific data structures to design your game, to the overview and code references of the internal workings of features, to gameplay design concepts. It explains the basics to begin using pokecrystal-board.
- Level selection menu
- Overworld
- Game navigation and progression
- Other features
- Internal design aspects
- Gameplay design aspects
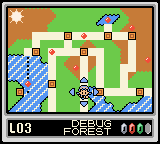
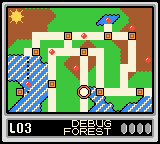
Level selection menu
The level selection menu is essentially a world map that the player navigates to select a level to play. The player can move through landmarks that correspond to unlocked levels in the level selection menu. The level seleciton menu can have multiple map pages each with their own landmarks. When the player moves from a landmark in one page to a landmark in another page, the new page is loaded during the transition.
The usual level:landmark relation is expected to be 1:1, but 1:n is also supported, for levels that may have alternative starting points.
The implementation is located in engine/menus/level_selection_menu.asm. GFX assets are included at the bottom of this file and point to gfx/level_selection_menu:
- LevelSelectionMenuGFX: tile GFX shared by all the pages
- LevelSelectionMenuPage*Tilemap: tilemap of each page
- LevelSelectionMenuAttrmap: attribute map shared by all the pages
- Various object graphics (direction arrows, etc.). These use PAL_LSM_* palettes.
A bunch of constants are defined for the level selection menu. These are mostly found in constants/landmark_constants.asm. Look out for those that start with or contain LSM.
The data is located in data/levels/level_selection_menu.asm. This is how you design your level selection menu:
- LevelSelectionMenu_Landmarks: landmark data. Each entry uses a level_selection_menu_landmark macro and specifies, in this order: page number, x coordinate, y coordinate, landmark name, spawn point, level stages.
- LevelSelectionMenu_LandmarkTransitions: for each landmark, its transition data for each of the four directions, in down/up/left/right order (i.e. applicable to when the player presses the corresponding dpad key while in the landmark). Each entry contains direction/displacement pairs. Maximum displacement is 7; if you want a larger movement use e.g. DOWN, 7, DOWN, 3. Note that if the level that a given transition points to has not been unlocked, said transition won't be available.
- LevelSelectionMenu_PageGrid: layout of all pages in the big picture. Each byte entry is the page number, or -1 for no page.
- LandmarkToLevelTable: denotes the mapping between landmarks and levels.
Overworld
The overworld uses a turn-based system. Each level is composed of one or more maps, and the maps are designed with spaces in them, which are meant for the player to move through them. Each turn the player rolls a die and advances spaces accordingly. Events may occur as appropriate while the player is advancing and/or when it lands in a space.
In addition to what is covered in this section, you can find more low level stuff about the pokecrystal-board overworld engine in the rough workflows described here: docs/develop/workflows.md. The core of the overworld engine is in engine/overworld/events.asm and, in a way, the main logic occurs in PlayerEvents. New board logic in this context is in CheckBoardEvent and the state is defined by BOARDEVENT_ constants. This state is maintained in hCurBoardEvent and is used for logic outside of CheckBoardEvent as well. Again, for in-depth details refer to the aforementioned workflows or to the code itself.
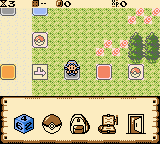
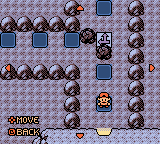
Board menu
The board menu is shown to the player at the beginning of each turn. In allows for several choices. The only ones that are specific to the pokecrystal-board engine are "roll die", "view map", and "exit level". The other three choices point to the party menu, bag menu, and pokegear, and are placeholders from pokecrystal. The board menu can be navigated horizontally. All menu options are accessed by selecting the corresponding icon of the menu, except for "view map" which is accessible via the Select button. All menu options except for "roll die" and "exit level" eventually return back to the board menu.
The implementation is located in engine/board/menu.asm. Icon tiles are drawn over the background of the textbox as if they were font characters. The current menu item is highlighted with a colored overlay using objects. This file includes also the animation logic for rolling a die when the "roll die" option is selected. These animations leverage the overworld sprite animation engine from pokecrystal. Finally, gfx/board contains GFX assets.
Board spaces
The spaces of each map are defined in the map file (in the maps directory) under *_MapSpaces. The definition of each space uses the space macro. An example:
DebugLevel2_Map2_MapSpaces:
	space  8, 12,  $0,  1 ;  0
	space  6, 12,  $0,  2 ;  1
	space  4, 12,  $0,  3 ;  2
	space  2, 12,  $0,  4 ;  3
	space  2, 10,  $0,  5 ;  4
The arguments of each space entry all take up one byte and are: x coordinate, y coordinate, space-specific data, id of next space.
The effects of each implemented type of board space are defined as scripts in engine/board/spaces.asm. Examples include gaining coins, losing coins, getting items, starting a Pokemon battle, or choosing among branching paths in the board. A lot of these are placeholder and can be implemented or augmented according to your design intentions.
Board space effects are triggered from PlayerEvents.CheckBoardEvent during BOARDEVENT_HANDLE_BOARD. Each space tile uses a specific collision value (COLL_*_SPACE, e.g. COLL_BLUE_SPACE), and the appropriate script is queued via CallScript for its later execution in ScriptEvents. Most space scripts have a check for whether the player has already landed on the space. But others (e.g. branch space, end space) trigger even if the player has not completed the movement. A branch space additionally does not count as an actual space in the movement (so it can't be landed on either).
When a player lands on a space, it turns into a "grey space" or "disabled space" with no effect should the player land on it in a later turn. This is so that potential paths in a closed loop don't allow the player to "go infinite", though this is more of an aesthetic thing, since technically there is no built-in mechanism that prevents the player from re-entering a level indefinitely to rack up coins, for example. This grey space is also used by default as the starting space of a level (which should be made to match the spawn point of the map).
Regular spaces
Regular space scripts have a check for whether the player has finished the movement according to the die roll and thus landed on the space. The actual effect is only executed when it is determined that the player has landed on the space.
Branch and union spaces
A branch space triggers even if the player has not completed the movement. A branch space additionally does not count as an actual space in the movement (so it can't be landed on either). In a branch space, the player is prompted to choose a direction to continue the movement. Some of these directions can be made locked until the player has unlocked a specific technique (Cut, Surf, etc.). Directions that can be followed are represented in the game with a colored arrow, whereas directions that are locked due to techniques are represented with a grey arrow.
The counterpart to a branch space is a union space. It is also noncounting and is used to denote convergence from multiple directions.
In a branch space, the last two bytes of the space macro are repurposed as a pointer to a branch struct with branchdir entries and ending with endbranch. For example:
	space  6, 12, .BS1    ;  2
	(...)

.BS1:
	branchdir LEFT,   13, 0
	branchdir UP,      3, TECHNIQUE_CUT | TECHNIQUE_SURF
	endbranch
Each branchdir entry includes: direction, next space id, required techniques. The order of entries is irrelevant, but do not put the same direction more than once in the same branch struct (in that case, all but the last entry using that direction will be ignored). The number of arguments occupied by required techniques in each branchdir entry is equal to the number of techniques you have defined divided by eight, and the techniques in each argument must be aligned to their byte as per the technique constants (more on this in Unlocked techniques).
End space
Landing on an end space means that the player has cleared the level. Like the branch space, the end space effect triggers even if the player has not completed the movement. It transitions the player to a post-level screen (and then back to the level selection menu.)
The space-specific argument in the space entry of an end space indicates the stage of the level to be cleared by reaching this end space. An ES* constant from constants/space_constants.asm is used for this (refer to this section for more information about level stages and level progression in general).
Board movement
The player moves in the board according to the next space id value of the last space passed through. Given SpaceA[NextSpaceId] = SpaceB, if the movement to follow between SpaceA and SpaceB is linear (all steps in the same direction), the movement is automatic. On the other hand, for non-linear transitions between spaces (e.g. to make a turn or to avoid an obstacle), something called anchor events have to be used.
Anchor events are defined in *_MapEvents under def_anchor_points in the map file. The next space id field of a space can instead represent a movement towards an anchor event by using a reserved value of GO_DOWN, GO_UP, GO_LEFT, or GO_RIGHT defined in constants/space_constants.asm. For example:
DebugLevel5_Map1_MapEvents:
	db 0, 0 ; filler

	def_warp_events

	def_anchor_events
	anchor_event 10,  1, GO_RIGHT
	anchor_event 12,  1, 39
	(...)

DebugLevel5_Map1_MapSpaces:
	(...)
	space  8,  0,  $0, 38 ; 37
	space 10,  0,  $0, GO_DOWN ; 38
	space 12,  0,  $0, 40 ; 39
In the above example, space 38 at coordinates 10,0 specifies to go down, causing the anchor event at 10,1 to be matched after a step. An anchor event has a next space id field that can similarly represent a movement towards another anchor event. In this case, the anchor event at 10,1 points to go right, causing the anchor event at 12,1 to be reached. This anchor event points to space 39. Since space 39 is at 12,0, a movement in the up direction will be automatically carried out, reaching space 39.
Note that if the next space id value of the last landed space or anchor event is an actual space id rather than a GO_* value, any anchor event that the player passes through in this movement will be ignored.
This simple board movement logic is located in engine/board/movement.asm and is part of DoPlayerMovement in engine/overworld/player_movement.asm.
Warp events and connections
The player can traverse warps as part of a movement between two spaces, or cross the connection between two maps. The way you define map connections and warps in maps of pokecrystal-board is the same as in pokecrystal, and the underlying engine behind warps and connections is also the same.
Crossing maps has implications in space data, however. In the destination map of the warp of connection, you have to define an anchor event in exactly the landing coordinates in order to hook the player after traversing the warp or connection. In the origin map, the space immediately before the warp or connection has to use a GO_* constant that points in the right direction.
Imagine a warp between an origin map and a destination map. The origin map could for example have this:
space 6, 10, $0, GO_UP ; 18
And the destination map could have this:
anchor_event 19,  2,  0
(...)
space 20,  2,  $0,  1 ;  0
This matches that, in the origin map, upwards from the space 18 at coordinates 6,10 there is a warp event that causes the player to end up in destination map at coordinates 19,2. The anchor event in the destination map denotes that the next space id is 0. Space 0 is at coordinates 20,2, so it's just a linear movement of one step from where the anchor event is at.
Note that origin map and destination map could be the same map in the specific case of a warp pointing to another place in the same map. The same rules and logic apply regardless.
While the above example showcases a regular space, this same logic can be extrapolated to branch spaces using the branchdir macro explained beforehand.
Technique events
Technique events in pokecrystal-board represent the equivalent of hidden machines in Pokemon Crystal. A technique like Cut, Surf, Rock Smash, etc. can be unlocked through game progression (how exactly is unspecified), enabling what you can imagine i.e. cutting trees, surfing over water, smashing rocks, etc. Technique constants are defined in constants/technique_constants.asm.
The main difference in pokecrystal-board is that techniques are executed in the overworld automatically. For example, when you are about to collide with a rock or tree, the corresponding technique handler is executed. This happens regardless of whether the technique is unlocked or not, in order to avoid the player getting stuck. This means that you should manage unlocked techniques by locking paths (in branch spaces) or levels until the required techniques have been unlocked.
Techniques are implemented in different manners. Cut and Rock Smash use objects entirely and are implemented through CheckFacingTileEvent in PlayerEvents, queuing the corresponding script. Surf (start/stop surfing) and Waterfall are also implemented in CheckFacingTileEvent alongside specific collision values carried over from pokecrystal. Flash is instead implemented as a map setup command.
As with other features, you can expand or modify the implemented techniques according to your needs.
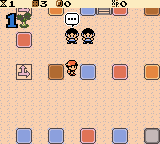
Person events
NPCs may interact with you while progressing in the board, either while on a non-space tile or on a space tile. These events are triggered through CheckTrainerOrTalkerEvent in PlayerEvents (this happens after a space effect, if applicable). Like trainers in Pokemon Crystal, NPCs interact with you when they notice you, i.e. if in the range of sight. All interactions in pokecrystal-board are NPC->player, not player->NPC.
The way to define these events is the same as in pokecrystal, through object_events in the map file.
The logic for these events (other than CheckTrainerOrTalkerEvent in PlayerEvents) is in home/trainers_talkers.asm and engine/events/trainer_talker_scripts.asm.
Trainer events
No mystery here. Trainer NPCs are defined the same way as in pokecrystal. The range of sight of each trainer object event has to be chosen appropriately. If a trainer battle interrupts a movement in the board, the movement is resumed when the battle is over. The exception is if the player loses the battle, in which case the player whites out from the overworld back to the level selection menu.
The flags for "trainer beaten" are expected to be reused for trainers across different levels, and cleared whenever a player enters a level (but this is merely a proposed design choice). There are flags scoped for this purpose exactly (see constants/event_flags.asm).
Talker events
Unlike trainer events, talker events are meant to be used for NPCs that interact with you for anything that's not a battle. As far as the object_event struct is concerned, it's the same as a trainer NPC (including range of sight mechanics), except the object type is OBJECTTYPE_TALKER instead of OBJECTTYPE_TRAINER.
The script pointer of a talker NPC points to an struct that uses the talker macro. Its arguments are flag, OPTIONAL/MANDATORY, TEXT/SCRIPT, 2-byte pointer to text or script. OPTIONAL means that the player will receive a prompt to skip this NPC's event. SCRIPT means that the 2-byte pointer points to an arbitrary script to be executed, while TEXT is a shortcut to merely make the NPC display text (it just executes a simple script enclosed in opentext/closetext).
Talkers can use turn-scoped flags that are cleared at the beginning of each turn, but like level-scoped trainer flags, this is just a predefined design choice.
For example:
.DebugLevel5_Map1Talker1:
	talker EVENT_TURN_SCOPED_1, OPTIONAL, TEXT, .Text

.Text:
	text "I'm a talker!"
	done
View map mode
The player can navigate a portion of the current overworld map by using a "View map" option available from the board menu or while choosing a direction in a branch space.
The view map mode is like a moving camera. The player sprite stays static while you move around. Movement speed is twice as fast as regular walking. Tile events, object events, and regular collisions are ignored here (e.g. warps are neither entered nor collided with), but going off-limits or off-range is accounted for.
Off-limits means that tiles that have special collision value COLL_OUT_OF_BOUNDS (specifically defined for this) can't be crossed, and that map limits can't be crossed unless there is a connection to another map. Additionally, a maximum view map mode range that the player is allowed in either direction, counting from the coordinates where view map mode was started, is governed by wViewMapModeRange (in number of tiles). Initialization or unlocking of wViewMapModeRange is your design choice.
View map mode is exited by pressing the B button. Exiting view map mode effectively triggers a warp to where the player was at before entering view map mode, with whatever the state was.
While in view map mode, hCurBoardEvent contains BOARDEVENT_VIEW_MAP_MODE. Transition from view map mode to the "regular" overworld occurs with hCurBoardEvent containing BOARDEVENT_REDISPLAY_MENU (if view map mode entered from board menu) or BOARDEVENT_RESUME_BRANCH (if view map mode entered from branch space). As with other board event values, they have a specific handler in CheckBoardEvent.
A rough workflow of the view map mode engine is available in docs/develop/workflows.md. View map mode player movement logic is at DoPlayerMovement in engine/overworld/player_movement.md along with other types of player movement. Logic for entering view map mode is embedded into the board menu code or the branch space code. When view map mode is entered, the player sprite is temporarily "turned into" an NPC (see MockPlayerObject), whilst the actual player sprite is made transparent.
Map state preservation
During a level, the state of map objects and disabled spaces is preserved across map connections and warps (the latter of which includes exiting view map mode). The state of map objects here means coordinates, facing direction, visibility, etc. This allows to preserve continuity during a level, from disabled spaces, to trees or rocks, to NPCs.
This backup state data is kept in dedicated WRAM banks and preserved on save to dedicated SRAM banks. The choice of the maximum amount of maps supported to backup state data is a trade-off between required RAM space and the maximum number of overlapping maps per level you want to support. You can define this value through the NUM_MAP_OBJECT_BACKUPS and NUM_DISABLED_SPACES_BACKUPS constants. WRAM (wDisabledSpacesBackups, wMapObjectsBackups) and SRAM space is allocated according to them. pokecrystal-board expands the SRAM size precisely to support expansion (but with the current configuration you could fit everything in Pokemon Crystal-sized SRAM).
The backing up of disabled spaces to WRAM is done individually per space the moment that space becomes disabled, through BackupDisabledSpace called from the space effect script. On the other hand, backing up of map objects to WRAM happens only when transitioning between maps, as a map setup command (BackupMapObjects) or when entering view map mode (BackupMapObjectsOnEnterViewMapMode). The data is copied from WRAM to SRAM automatically during save.
When a map is entered during a level, if the map has been visited before during the current level, there will be backup disabled space and map object data for it. Its existence is looked up in wDisabledSpacesBackups and wMapObjectsBackups by searching for an entry matching the map group and map id of the map being entered (LoadDisabledSpaces map setup command and an extension to CopyMapObjectEvents all the way from the LoadMapAttributes map setup command).
Game navigation and progression
The main menus (in some cases just mocks) outside the overworld provided in pokecrystal-board are:
- The titlescreen simply carried over from pokecrystal (engine/menus/titlescreen.asm)
- A main menu (engine/menus/main_menu.asm) with "New game" and "Continue" options engine/menus/intro_menu.asm. Save file agnostic.
- A game menu (engine/menus/game_menu.asm) which is the main entry point after the save file is loaded. The "World" option will lead to either the level selection menu or to the overworld, depending on where the save file is from.
- The level selection menu, as covered in its section
- A "post-level screen" or "level cleared screen" (engine/menus/cleared_level_screen.asm) that transitions the player from the overworld to the level selection menu after a level is cleared (if whited out or exited level, player goes straight to level selection menu).
The envisaged progression in pokecrystal-board is that the player progresses in the game by clearing level stages, which in turn unlock more levels that let the player clear more level stages. Progression is tracked by flag arrays wUnlockedLevels and wClearedLevelsStage1 through wClearedLevelsStage4. Unlocked techniques are tracked by flag array wUnlockedTechniques. Each level supports anywhere from 1 to 4 clearable stages which corresponds to alternative endings of that level (whether you design one ending for all levels, four endings for all levels, a mix, etc., is your design choice).
The logic to clear a level stage and to unlock levels happens within the aforementioned post-level screen (see ClearedLevelScreen) alognside other progression-related tasks like persisting the coins that the player has collected in the level.
How levels are unlocked along the way is dictated by the LevelUnlockRequirements table in data/levels/levels.asm, which has one level_unlock_req entry per existing level. Everytime the player clears a level stage, the conditions for unlocking each level not yet unlocked are checked, unlocking those that meet the conditions, up to a maximum of MAX_UNLOCK_LEVELS_AT_ONCE. There are three types of conditions you can specify: LEVELS_CLEARED, NUMBER_OF_LEVELS_CLEARED, and TECHNIQUES_CLEARED. You can mix and match level unlock requirements as per your game design. For example:
	(...)
	level_unlock_req LEVELS_CLEARED, LEVEL_1, STAGE_2_F, LEVEL_2, STAGE_1_F ; LEVEL_3
	level_unlock_req NUMBER_OF_LEVELS_CLEARED, 3 ; LEVEL_4
	level_unlock_req TECHNIQUES_CLEARED, TECHNIQUE_FLASH | TECHNIQUE_WATERFALL, 0 ; LEVEL_5
	(...)
Means that: LEVEL_3 becomes unlocked when stage 2 of LEVEL_1 and stage 1 of LEVEL_2 are both cleared; LEVEL_4 becomes unlocked when you clear your third level stage; LEVEL_5 becomes unlocked when Flash and Waterfall have both been unlocked. As with branchdir, the number of arguments occupied by techniques after TECHNIQUES_CLEARED is equal to the number of techniques you have defined divided by eight (in the above case, there are 9-16 and both Flash and Waterfall are among the first eight).
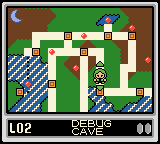
As mentioned before, when a level stage is cleared, the transition is overworld -> post-level screen -> level selection menu. When the player unlocks one or more levels as a result of this, the entry to the level selection menu displays a small animation that indicates the levels that have been unlocked:
On the other hand, an exit from the overworld directly to the level selection menu can occur if the player whites out or leaves the level through the "exit level" board menu option. Exiting the overworld is done through the exitoverworld script and its only argument is a constant that denotes the exit overworld reason. Currently, CLEARED_LEVEL, ABANDONED_LEVEL, and WHITED_OUT_IN_LEVEL are defined.
Other features
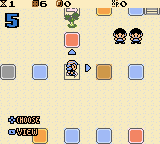
Window HUD
home/hud.asm and engine/gfx/hud.asm include an engine that can be used to construct and display a HUD at the top of the screen. This HUD uses the Game Boy's window, and overlays a portion of the Game Boy's BG map.
The amount of scanlines occupied by the HUD is controlled by hWindowHUDLY. Writing any non-0 value to this address enables the window-based HUD. Enabling the window-based HUD means that the LCD interrupt is configured in LYC=LY mode in the corresponding scanline; the vblank interrupt enables the window, and the LCD interrupt disables it (through the LCDC register) (note: the window-based HUD can't be enabled simultaneously with pokecrystal-native LCD interrupt usage through hLCDCPointer, used during battle transition, battle animations, and movies).
The content of the overworld HUD in pokecrystal-board shows: turn number, die number rolled this turn, coins accumulated in the level, and an unused metric ("experience"). Overworld HUD design is up to your implementation. Several states cause the overworld HUD to be hidden, such as a Pokemon battle, the "view map" mode, the party menu, or the bag menu.
The available functions to use the HUD engine are:
- EnableWindowHUD: Configure LCD interrupt in LYC=LY mode with corresponding LYC
- DisableWindowHUD: Configure LCD interrupt in hblank mode
- LoadWindowHUD: Load the HUD at wWhichHUD to the top of wTilemap and wAttrmap. Only does anything if hWindowHUDLY is non-0
- LoadHUD: Load the HUD at wWhichHUD to the top of wTilemap and wAttrmap (without using the Game Boy's window)
The window-based HUD is currently only used in the overworld. Individual HUD types with their own hWindowHUDLY (if window-based) and their own content are supported through the LoadHUD/LoadWindowHUD pointer table. Each entry points to a handler for a specific HUD type (e.g. HUD_OVERWORLD, as defined in constants/gfx_constants.asm) meant to implement the loading of the HUD's content to wTilemap and wAttrmap whilst enabling the HUD. But, in pokecrystal and thus also pokecrystal-board, the overworld normally doesn't use wTilemap and wAttrmap directly (only when a textbox is open), so the overworld HUD engine requires additional functions beyond the above four generic functions:
- ConstructOverworldHUDTilemap: Draw the overworld HUD's tilemap into wOverworldHUDTiles
- TransferOverworldHUDToBGMap: Transfer overworld HUD to vBGMap1/vBGMap3 during v/hblank(s). Tilemap is read from wOverworldHUDTiles, attrmap is all PAL_BG_TEXT | PRIORITY.
- EnableOverworldHUD & DisableOverworldHUD: Like EnableWindowHUD & DisableWindowHUD but include (un)setting wWhichHUD and hWindowHUDLY. EnableOverworldHUD also includes calling TransferOverworldHUDToBGMap first.
- ConstructAndEnableOverworldHUD: ConstructOverworldHUDTilemap + EnableOverworldHUD (used to construct, enable, and transfer HUD when not enabled)
- RefreshOverworldHUD: ConstructOverworldHUDTilemap + TransferOverworldHUDToBGMap (used to reconstruct and retransfer HUD when already enabled)
For example, ConstructAndEnableOverworldHUD and EnableOverworldHUD are used in map setup scripts as appropriate, and RefreshOverworldHUD is called between turns or any other time that the HUD's content needs refreshing. DisableOverworldHUD is used for example when leaving the overworld or to transitions to screens that don't display the HUD (battle, party menu, view map mode, etc.).
Overworld textbox and font
The overworld uses a 2bpp font by default to display text, menus, etc. The font type (1bpp or 2bpp) is managed by wText2bpp, which is TRUE by default in the overworld. Actions like leaving the overworld, opening a submenu like the party menu, starting a battle, etc. turn wText2bpp to FALSE. This address dictates whether menu-drawing and text-printing functions act as 2bpp or 1bpp when drawing the textbox layout. Notably, note that 1bpp text is not compatible with the overworld HUD enabled, because the latter uses 2bpp font tiles.
2bpp textboxes do not fully hide sprites that are partially covered like it (see CheckObjectCoveredByTextbox).
Your custom textbox layout can be assigned on a per-map environment basis, including the tiles, tile arrangement, and color. See engine/gfx/overworld_textbox.asm for the implementation. Corresponding graphics are included in OverworldFrames in engine/gfx/load_overworld_font.asm.
Note that the map name sign feature is not used in pokecrystal-board, and, in fact, the only placeholder type of overworld textbox currently in pokecrystal-board uses this frame.
RGB palette fading
engine/gfx/rgb_fade.asm includes an engine that can be used for individual color fading from source palettes to destination palettes in steps of 2 points per RGB channel. Custom fading functions (with their own fading speed and selection of source palettes and destination palettes) that use this engine are implemented in RGBFadeEffectJumptable triggered by calling DoRGBFadeEffect.
This fading engine is used in the level selection menu and in the transition from overworld to post-level screen. When designing the timing your own fading functions, be aware of the latency introduced by the engine itself: each color takes around 3.2 scanlines to fade (in normal speed mode), so up to around 10-11 palettes can be faded in a whole frame.
In addition to this engine, for manual fading you can automate the derivation of the RGB values of intermediate steps using the rgbpals_* macros available in gfx/macros.asm, as done for example in gfx/level_selection_menu/background.pal.
Internal design aspects
This section covers miscellaneous internal design aspects not yet fully covered in other sections, but that affect the management of specific data in pokecrystal-board.
Metatiles and tilesets
pokecrystal-board establishes design conventions regarding the arrangement of tilesets and metatiles that you may or may not want to alter depending on your needs. Note that in this section tile refers to a 16x16 pixel area (i.e. a quarter of a metatile).
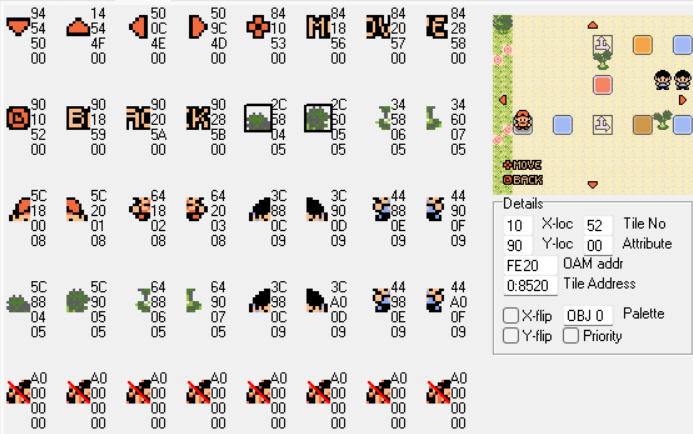
Metatiles
There are two groups of metatiles: those with a space tile, and those without one. space tiles are always located in the top-left tile of the metatile but this is not a requirement so long as you manage this in the board movement.
Metatiles with a space tile take up metatile slots 0x80 through 0xff in a given map. A given metatile is identical, except for the space tile, to another metatile that is offset by 0x20 (so 0x80 is identical to 0xa0, to 0xc0, and to 0xe0). Metatiles from 0xe0 to 0xff all contain grey space tiles. This is because the logic for disabling spaces (see Board spaces) converts a given space into a grey space by oring it by 0xe0.
The distribution of space types in your tileset should be according to the needs of your specific level, or you could potentially standardize a base layout that works for all levels as much as possible. For example, in pokecrystal-board the blue space that gives coins to the player is the most prevalent, so metatiles 0x80 to 0x97 could be reserved for blue spaces. On the other hand, red spaces and battle spaces are less frequent, so they could split the space from 0xa0 to 0xbf.
The picture below made with Polished Map illustrate an example layout. Notice how metatiles are identical in batches of 0x20 except for the space tile.
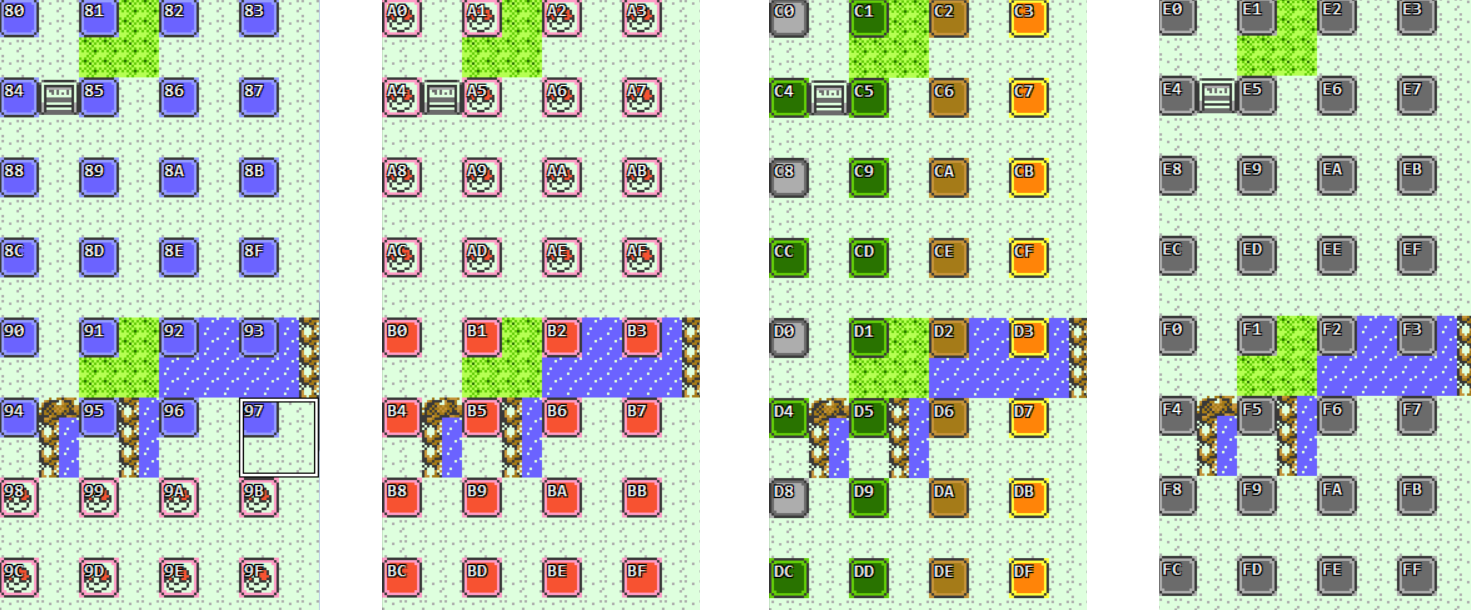
On the other hand, metatiles from slots 0x00 to 0x7f can be used for metatiles in the background that don't have any space tile. This space is additionally reserved for metatiles with a branch space or a union space, as these are un-landable and never convert into grey spaces.
For space tiles (landable or un-landable), remember to use the right collision value (e.g. BLUE_SPACE).
Tilesets
In pokecrystal-board, tiles 0xc0 through 0xff are reserved for space tiles, while tiles 0x00 through 0xbf complete the rest of the tileset with background tiles. As space tiles are 16x16 pixels, there is a row of eight spaces from 0xc0 through 0xdf and another row of eight spaces from 0xe0 through 0xff.
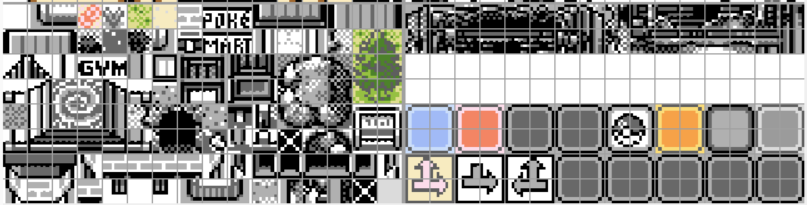
However, when loading tileset graphics, the area reserved for space tiles (0xc0-0xff) is not filled from the individual tileset. Instead, LoadTilesetGFX in home/map.asm, loads the first row from TilesetFixedSpaces and the second row from TilesetVariableSpaces*. The latter can be configured per tileset, as an additional numeric argument in the tileset macro that points to an entry of the TilesetVariableSpacesPointers and TilesetVariableSpacesPalMaps tables. The space tile graphics are included in gfx/tilesets/spaces.
Overall, the first row of tiles is meant for spaces that are mostly fixed (e.g. blue, red, item, battle spaces) whereas the second row is meant for spaces that vary far more, but that still may be shared by some tilesets (e.g. different types of branch/union spaces, or regular spaces that are highly unique). Note that when using a tool like Polished Map, you probably still want to draw the space tiles as part of the regular tileset, for ease of building and editing maps (and the whole regular tileset is INCBIN'd compressed into the ROM anyway, so you could rightly argue that this whole separation is useless since it's not saving space at all!).
Maps
Map identifiers
The concept of map group and map id is the same here as in pokecrystal. In pokecrystal-board, spritesets are assigned per map group and per map id rather than just per map group (you handle adjacent map consistency yourself where necessary), and apply to both outdoor and indoor maps rather than just the former. A sensible design approach would be to assign the same map group to all the maps that are part of the same level, thus effectively assigning a unique map group to each level. However, this isn't enforced anywhere in the logic of pokecrystal-board.
Map environments
The map environment value is meant to take more protagonism in pokecrystal-board compared to pokecrystal, as you see fit. With map environments, you can reflect the nature of a map, e.g. OUTDOOR_GRASSY, OUTDOOR_MOUNTAIN, OUTDOOR_SEA, INDOOR_FOREST, INDOOR_CAVE, etc. Environments are additionally split between outdoor and indoor at INDOOR_ENVIRONMENT. The elements indexed by map environment include EnvironmentColorsPointers and OverworldFrames (see Overworld textbox and font).
OAM management
For drawing small complementary screen elements in the overworld or the level selection menu (e.g. arrows, legend text, the die, etc.), pokecrystal-board uses a mix of sprite animations or straight up writes to available space in wShadowOAM.
In pokecrystal-board, the sprite animation engine supports a mode of not wiping up Shadow OAM (in DoNextFrameForAllSprites) in order to work alongside other OAM in the overworld. This is turned on by setting bit DONT_CLEAR_SHADOW_OAM_IN_SPRITE_ANIMS_F of wStateFlags.
In the overworld, these complementary sprites are referred to as secondary sprites and are managed by the same logic that manages the displaying NPCs: InitSprites. In InitSprites, InitSecondarySprites, checks for requested secondary sprites in the form of wDisplaySecondarySprites bits set and processes each requested sprite collection sequentially. It's your responsibility to ensure that you are not exceeding the hardware limit of more than 40 objects at once or more than 10 objects per row considering both NPCs and secondary sprites.
To update just secondary sprites without processing NPC sprites, you can use UpdateSecondarySprites. However, if secondary sprites have shrinked or expanded since the last sprites update, it will fall back to calling UpdateActiveSprites to properly reposition all sprites to avoid corruption.
The tiles reserved for secondary sprites in the overworld are 0x20 through 0x7e in VRAM bank 0. Tiles from 0x00 through 0x1f are reserved for NPC sprites. You may want to adjust the separation point according to your needs. charmap.asm defines the placement of secondary sprite tiles for different use cases. The start tile of 0x20 is denoted by SECONDARY_SPRITES_FIRST_TILE. From there, it's a matter of managing which sprites may or may not overlap to place their tiles in VRAM in the way that most optimizes the available space.
A bunch of these secondary sprites, like the directional arrows in the level selection menu, a branch space, or the "view map" mode, share the palette of the player character. Others use a specific palette. Again, this is your design and graphical aspects are considered placeholder.
Player characters
Player data has been centralized into the Players table from data/players/players.asm, including overworld sprites and their states, player pictures, and their palettes. Player constants are defined in constants/player_constants.asm. When you define pointers in a player entry in the Players table, you must ensure the equivalent argument in all entries points to something in the same bank.
For example, in:
Players::
	player ChrisStateSprites, PAL_OW_RED, ChrisSpriteGFX, FishingGFX, ChrisPic, ChrisBackpic, PlayerPalette   ; PLAYER_CHRIS
	player KrisStateSprites, PAL_OW_BLUE, KrisSpriteGFX, KrisFishingGFX, KrisPic, KrisBackpic, KrisPalette    ; PLAYER_KRIS
	player GreenStateSprites, PAL_OW_GREEN, RivalSpriteGFX, FishingGFX, ChrisPic, ChrisBackpic, PlayerPalette ; PLAYER_GREEN
ChrisSpriteGFX, KrisSpriteGFX, and RivalSpriteGFX must point to graphics located in the same bank as each other, and so on.
Note that for many pokecrystal features that are considered placeholder or discontinued in pokecrystal-board (e.g. player selection/naming screen, Pokegear, pack, trainer card, Magnet Train, etc.), pokecrystal-board still uses legacy PLAYERGENDER_FEMALE_F flag. The concept of player gender is otherwise deprecated.
Gameplay design aspects
This section covers miscellaneous gameplay design aspects not yet fully covered in other sections.
Game currency
pokecrystal-board uses the concept of coins as the main currency. You can earn coins during a level by landing on blue spaces. The amount of coins added by landing on a blue space, or substracted by landing on a red space, are equal to the MAP_BASECOINS value of the current map (an argument of the map macro) multiplied by the die number rolled in the current turn.
During a level, coins are tracked in a temporary balance that is only committed to the player's actual balance if and when the level is cleared. It's not possible to earn a negative amount of coins during a level (substracting below 0 results in 0).
Other means to earn coins, and how to actually spend the earned coins is unspecified.
Time counting
Time counting in pokecrystal-board is detached from the RTC. In fact, pokecrystal-board uses a MBC chip without RTC support. Instead, there are four time of days: morning, day, evening, and night. Clearing a level advances the time of day (see AdvanceTimeOfDay in home/time.asm) and time doesn't advance in any other manner.
Time of day impacts the overworld as it does in pokecrystal, and in pokecrystal-board the time of day is also reflected in the level selection menu. However, day-based events are not used in pokecrystal-board. Still, the transition from night to day advances a day through wCurDay, up to MAX_DAYS, and triggers ClearDailyTimers, so you could implement day-based events by tracking days passed this way.
Play time counting works in the same manner as pokecrystal and is enabled/disabled through GAME_TIMER_COUNTING_F in wGameTimer. By default, this flag is only set while in the overworld (i.e. in a level), but like many other things in pokecrystal-board, this is your design choice.
Game autosaving
During a level, the game is automatically saved between turns. This happens in BoardMenuScript.Upkeep by calling AutoSaveGameInOverworld. The game is also automatically saved right after exiting a level for any reason (clearing it, exiting it, whiting out) by calling AutoSaveGameOutsideOverworld. When the game is turned on, if the save file is in the overworld, the player spawns there. If the save is outside of the overworld, the player is sent to the level selection menu instead.